Showing posts with label KAL. Show all posts

Thursday, 15 October 2015

Techniques for Swing Me Right Round: Short Rows and Grafting #backtofrontKAL Part 2

There are a few techniques in the pattern that are not necessarily standard to all jumper patterns, though are really handy to know how to do. There are links to tutorials for all these techniques in the techniques section on the first page.

Short rows

Short rows are a requirement in the pattern to work the shoulder slopes on the back and the front of the jumper. There are many different short row techniques out there including wrap and turn. However the recommended short row method in the pattern is either Japanese short rows or German short row. This is because these methods are simple and less noticeable in the fabric, in fact there are many times that I have gone back to look at my knitting and I can't see where my short rows end, because it blends in so well. Of the two methods in the pattern German short rows are the simplest and easiest to do, they don't require any extra knitting supplies like stitch markers or pins and they are easy to work both when doing the short row and closing it.

German Short Rows

On the WS Side
German short rows on the wrong side are created by purling to the last stitch before you turn your work (or if you are adapting a wrap and turn pattern, purling the stitch you would have wrapped) and after turning to the RS bring the yarn to the front between your stitches then slip the last stitch from your LHS needle to your RHS needle.


 Lift the yarn up and over the LHS needle, so it carries the stitch below upwards and continue knitting. You will now have what looks like a double stitch on the needle where you turned.
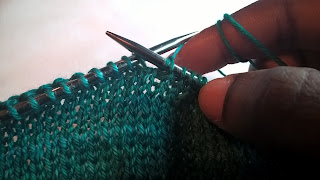

On the RS side
To do a German short row on the right side all you need to do is knit to the last stitch where you turn (if in a wrap and turn pattern, knit the stitch you would have wrapped), turn the work and slip your last stitch. Lift the working yarn over the needle as if you are doing a yarn over from front to back and bring the yarn back to the front. Then purl up to your next turning point.  There will be a what looks like a double stitch on the needle where you turned.
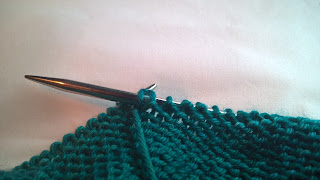

These double stitches are useful for showing you where your turning points are and are worked as a single stitch. The beauty of this is that the lifted stitch closes any holes between the two different levels of stitches at your turning points and also creates a smoother step. It is also less visible from both sides of the knitting when picked up. So when you go to incorporate your short rows into the fake shoulder seam, you only have to knit or purl as you normally would treating the double stitches as one single stitch. Nice and simple, and very neat.


Grafting


Grafting is also referred to kitchner stitch. The wrap front of the jumper requires grafting in the centre if you elect to knit the pattern as written either bottom up or centre out with the bottom half of the jumper being knit first. Whilst grafting requires patience, it is actually relatively simple to do neatly in plain stockinette and in a ribbed pattern.

Lucy Hague's instructions for grafting in pattern are amazing and can easily be translated here, for this particular pattern the stitches that you will be grafting in pattern are

p1 k1 p1 k1 p1 Knit x stitches p1 k1 p1 k1 p1

To prepare your knitting for grafting, Get another cable needle and pick up the stitches from the provisional cast on/ or waste yarn left at the back, this should match the amount of stitches you have left on your other needle after joining the left and right wrap sections together. This ensures you have two sets of live stitches, For the purposes of grafting your front stitches will be the bottom and the top stitches will be the back stitches. So when you hold it up the RS of the bottom will be facing you and the WS of the top will be facing you behind the bottom.

With 2-3x the length of your row of yarn for grafting, add your sewing needles and follow the instructions below by when the instructions say purl, pulling the needle and yarn through the centre of the stitch from behind, and when the instructions say knit pulling the needle and yarn through the centre of the stitch from the front.

Here is a useful grafting video showing you the stockinette method.

With this in mind you follow the instructions like so

1 p st, 1 k st on F
F: purl off, purl on
B: purl off, knit on
1 k st, 1 p st on F
F: knit off, knit on
B: knit off, purl on
1 p st, 1 k st on F
F: purl off, purl on
B: purl off, knit on
1 k st, 1 p st on F
F: knit off, knit on
B: knit off, purl on
1 p st, 1 k st on F
F: purl off, purl on
B: purl off, knit on

Then
2 (or more) k sts on F
(Stockinette grafting)

F: knit off, purl on
B: purl off, knit on

until you reach your last knit stitch before the next purl where you will then

1 k st, 1 p st on F
F: knit off, knit on
B: knit off, purl on
1 p st, 1 k st on F
F: purl off, purl on
B: purl off, knit on
1 k st, 1 p st on F
F: knit off, knit on
B: knit off, purl on
1 p st, 1 k st on F
F: purl off, purl on
B: purl off, knit on
1 k st, 1 p st on F
F: knit off, knit on
B: knit off, purl on

All credit goes to Lucy Hague for the grafting instructions, I have only organised them into the order used for grafting in this pattern.

Let me know if there are any other techniques I should go over.
Have you had any experience grafting in pattern before?

Monday, 14 September 2015

Swatching and Getting Started #backtofrontKAL Part 1

This is the first part of the Swing Me Right Round Knit- along series, with tips and tricks on how to use the pattern, #knitting help and general advice to follow.

Remember the pattern is on SALE through September for the knit-along with code KALtime! and is free with any purchase of Companion 4ply or Echo Dk for the KAL.

I've previously stated the importance of #swatching , mostly because I honestly cannot stress it enough, especially if you want to knit the Swing Me Right Round Jumper. This beautiful jumper is requires essential swatching as the idea is not to knit to a standard size but based on your measurements, because of this there are some calculations involved, but don't worry there is a link in the pattern to a handy spreadsheet that enables you to input your gauge ( over a 4in square), your measurements and it does the calculations for you to tell you how many stitches to cast on for either construction option and how many stitches you should have at the important sections.

A quick note on choosing yarn - whichever yarn you choose to use for the pattern, 4ply, Sport or DK weight yarn, pick a yarn with a high percentage of wool for structure and warmth. Blends can be nice especially if you would like to add drape when choosing a thicker yarn. The thinner yarn choices will have more drape at the pattern gauge.

Lets first start with Swatching

As a knitter something you learn over time is what type of knitter you are/how you knit. I know I knit quite tightly which hasn't changed a lot, though my tensioning is certainly more consistent now as opposed to when I started out. So with an understanding of what type of knitter you are pick a size of needle you think will let you achieve gauge with the yarn you've chosen. If you haven't quite figured out what kind of knitter you are yet, that's fine too, just start with the recommended needle size for the pattern. Which in this case is 3.5mm. The pattern gauge to achieve is 21 stitches by 32.5 rows per 4”/ 10 cm in Stockinette stitch.

This colourway is gorgeous layered and gradient turquoise and greens, plus notoriously hard to photograph!

I've chosen to knit myself a second Swing Me Right Round, this time in a fingering weight yarn. My Yarn is Third Vault Yarns Companion 4ply in the Emerald City Colourway, available as dyed to order (please note the yarn is a deeper green with teal than can be seen in the photos).

Knit your swatch larger than the recommended amount of stitches, to allow for easier pinning and measuring, always measure from the inside of your swatch, as the consistency of your stitches will likely vary when closer to the edge of the swatch.

I've knit mine to 26 stitches by 41 rows, granted I did switch needle sizes in the middle. I started out with the 3.5mm needles but after 21 rows I realised that my tight knitting was getting me nowhere near gauge and I went up a size to 3.75mm needles which kept me happy (I like a tighter look in my knitting) whilst also taking me closer to gauge. Though still out by 3 stitches, which is fine as I can just put my actual gauge into the spreadsheet for my calculations.


Technically it is better to cut your yarn and once you've cast off your swatch so that you can then wash and/or block the swatch the way you would treat your garment. However I'm not a fan of cutting my yarn, unless we are steeking and that is a whole different ball game! As I will be steam blocking the garment that's what I've done to my swatch.


Taking Measurements and Using the Spreadsheet

A link to the spreadsheet is available on the first page of the pattern.


The schematic above shows where each part of the jumper should lie on the body. Use a flexible tape measure to get your measurements. You can do this yourself or ask someone else to help.

Adapted from one of the great croquis produced by www.dctdesigns.com
Measurements

  • A - This is taken from where you would like the lowest point of the jumper to hit, or your hips.
  • B - This is taken from your natural waist, the point where some people go inwards between their hips and bust.
  • C - This is taken across your bust.
  • D - This will be the distance between the bottom of your Jumper and your Natural Waist
  • E - This measurement is the distance from your Natural Waist to your shoulder.
These measurements should be put into the spreadsheet, I won't show you my exact measurements because I'm shy :P

The purple oval shows where to input your measurements

The green ovals show your calculation output, based on your gauge which is put into the sheet under the schematic and your measurements.

Depending on which construction method you choose, you will either use the Stitches at Natural Waist number (Centre Out) - which if you choose to do the top part first will be halved, or Stitches at Bottom number (Bottom Up).  This will be your number of cast on stitches.

Casting on

Centre Out - This Cast on will be a provisional cast on

I use the long tail provisional method this is a great video for the provisional method I use by PostStitch on Youtube. This link is included in the pattern.

Bottom Up - I recommend a Tubular Cast on because I love the way it looks

Tubular cast on tutorial wonderfully explained by Ysolda
Long Tail cast on tutorial explained in pictures, alternatively follow the provisional method video with only one yarn/ no waste yarn. (using two different balls of your yarn, does make it easier, as it saves you having to judge the length of tail you need), when finished casting on, cut the yarn that goes over your thumb (what would be the waste yarn).

Pattern Chart

The pattern chart direction differs depending on which construction option you pick, with Centre Out you will be knitting the pattern downwards and likely doing some increases to your hips. The measurements above show that I need to do 2 increases as I knit downwards. For best effect I will do all but two of the pattern changes shown in the chart as switch rows (where I neither increase or decrease into the pattern) where you use the stockinette stitches either side of the pattern and bring them into the pattern. The increases I will do at pattern change 1 and 4 to space it out but also to make sure that the slope of the garment is big enough before it gets too far down to my hips. If you have more increases you can space them out accordingly.

For bottom up you are likely to be decreasing instead, try to space these out evenly so do them at every other pattern row change, if you have more or less than suggested in the pattern then space them out accordingly with more decreases as you get closer to the natural waist.


Happy Knitting! Let me know what information you would like to see next about knitting the Swing Me Right Round pattern.

#yarn #wool #handdyedyarn #knittingpattern #sale #tutorial #thirdvaultyarns

Sunday, 13 September 2015

Swing Me Right Round #backtofrontKAL


It's been a while since the release of the Swing Me Right Round pattern, but I decided to hold a Knit along running from September 7th to October 31st on Ravelry , to coincide with the kids going back to school and autumn/ fall weather putting us back in the mood for wool knits.

The Knit- along is being held in the Third Vault on the Left Ravelry group and projects should be tagged with backtofrontKAL

For the KAL I am offering £2 off the pattern for the first month (September) please add the jumper to your cart and use the code : KALtime!

I am also offering those who purchase/ have purchased Third Vault Yarns Companion 4ply , which incidentally is listed in the shop in some lovely geeky colourways, the pattern completely free with another coupon code, which will be sent to anyone having purchased through the shop. If you purchased Companion 4ply from Nine Worlds or through another avenue, please contact us via email or through our Facebook page. Any Custom Orders for the KAL will also receive a free gift!

The KAL can be joined any time before the end of October with no obligation to finish knitting by the end, however if you would like the opportunity to win prizes you must reach either over 50% completion or complete the entire Jumper with finished pictures. Details of the prizes are below.

Prizes

  • For those who finish their jumper before or on the 31st of October and have finished pictures with their jumper on the project page will be entered into a draw to win one of three skeins of Third Vault Yarns yarn, either Echo Dk or Companion 4ply and the noughts and crosses cowl pattern due to be published end of October.
  • For those that joined in but have not completed their jumper by the deadline but it is over 50% complete, the person that posts the funniest picture of them with the jumper will receive the noughts and crosses cowl pattern, with a discount code for Echo Dk

Keep an eye on the blog if you're taking part as I will be talking through the pattern and the process, with some hints and tips.

Saturday, 7 March 2015

My Knitting year ahead

I realised I only slipped in a very brief mention about the Ultimate KAL by the Plum Dandi Ravelry group in my last post, even though i've been knitting for it fiercely since the 20th of January umming, and aahing and planning since before it started on the 9th. I chose to make Ease by Alicia Plummer because I look at that jumper and every time I see it, it screams relaxed comfort to me. I want a jumper that does that. So I swatched, don't get me wrong I hate swatching and I do the bare minimum if I can get away with it. Massive slap on the wrist there. If you haven't knit with a yarn before, quite possibly on those needles (even if you have done it with others to a different gauge) SWATCH because it could and likely will come back to bite you in the ass. I think the people who can get away without swatching are really confident but above all tend to know how they knit with a good base range of yarns and needles, but also they maybe knitting things they don't care about the fit of.

So, if you're knitting a scarf or a rectangle or something without shape, you don't need to swatch, if you want a garment that fits that works with your body, you swatch, you calculate you do the hard stuff that knitting asks of you, so at the end of you however many hours, you have a piece that you don't hate because it doesn't fit right, you might hate it for other reasons, you picked the wrong colour, the pattern wouldn't have flattered the person you are anyway, etc.  It won't however be because it doesn't fit!

Swatching in the round - on top of my revision :P
Yes if the pattern requires you to knit in the round SWATCH IN THE ROUND. There are some helpful links to tutorials for doing this from Techknitter to Ysolda both invaluable resources that definitely know their shit! What it all boils down to is, knit to one end of your row and instead of turning your knitting take it to the other end of your needle (DPNS or CIRCS required) take the working yarn from the other side of your swatch, loop it round your hand loosely and knit back across from the end where the yarn wasn't, repeat.

I've digressed a bit from the point of this post though, which is to tell you a little about what i've planned for my knitting year, and the end of the Ultimate KAL. I finished my Ease! I love it, I played with colour, I played with the fit and I made it me. Obligatory bathroom mirror selfie (vom at that word!) below


I added Horizontal Bust Darts (through short rows), I added an invisible/ inseam pocket i changed up the sleeves using a chart from a different pattern, I switched up the shoulders with another similar pattern. I was unafraid to make it different and mine. Never be afraid to do that with your knitting, just as you shouldn't be afraid to ask for help, I was all over the internet  looking for links, I deliberated on a million things asked my Stitch 'n' Bitch group for their opinions and forged on, with a fair amount of swearing and frustration. I got so frustrated with the sleeves I jumped onto several different projects mid knitalong! I do however love it now, it's very me and very fun, whilst also being slightly outside my comfort zone. Plus it's finished before the end of the Ultimate KAL that is due on the 9th of March 'happy dance'. I did actually start another that was also for the KAL whilst i knit Ease, but I didn't expect that to be finished. However it is a perfect start to my summer knitting. I decided a while back, summer knitting got started in the winter/late winter so i could finish it and actually wear it in the summer and not have to wait a year for appropriateness.

I'm knitting Sandshore now, by Alicia Plummer again, but I do love her patterns I have A LOT of them. As others have said, it is a pretty quick knit relatively it is flying off the needles (that could be more to do with the size of the needles and the different gauge, I knit my Ease way tight on 4.5mm needles instead of 6 or 6.5mm). Large gauge things which make a holey fabric are a little hard for me, but in this case i'm going with the flow because it looks good, it works in the pattern and everyone's pictures and i've not worked with the yarn before so i'm developing a preference for working with it in a certain way as I go. If I was to show this to a certain bulletproof knitter I know and love, she might have an apoplexy. 

For the rest of my year it's going to be garments galore, mostly for me, depending on how I feel I might throw a gift into the mix, but I am a selfish knitter. Why so many garments?

I've only gone and joined another KAL the Tin Can Knits KAL on ravelry. 12, yes 12 garments in 2015, AAAAAAAARGH, am I setting myself up to fail? after all I graduate this year and hopefully get a job so will be quite probably busier, much busier than i am now. Where will my knitting time come from? It is however a goal, a challenge but a goal and hey i'm 3 jumpers in, 2 down 1 finishing off and 9 left to go. I don't see laceweight in my future this year, but one or two fingering, most definitely my funky grandpa, I have wanted it for ages and it has been earmarked since last year. Now it is a very real possibility because i've 100% decided on yarn 

2 Kingcraig lambswools, and 2 drops delight
The other jumpers in my list include some summer weights and some winter knitting, it's all gravy, maybe. So I shall keep you guys updated as I go and post pictures of them all together at the halfway mark. Next post though will be about finishing number 3, cardigan for the summer and the ribbing technique that I plan to try and try and share my process. Stick around you won't be disappointing and do not be afraid to join in!


NB: I did not use that particular tutorial for horizontal bust darts, I used the secondary tutorial you receive with all of Mary Annarella's patterns . I found the above when I was discussing bust darts with other people on the forums about using bust darts. 
#tck12sweaters2015 #ultimatekal

Tuesday, 11 November 2014

Uni Days but knitting is still a feature!

I'm back at uni again, and as per usual it's kicking my ass, which mean late nights in the Lab and less time for knitting. only joking, still knitting as much as possible. Started and finished off a worsted weight Jumper in September and have started a few new jumpers, one of them a design of mine, another a Knit Along that i am running for all the new Knitters in our Stitch n Bitch Society. We are doing some easy jumpers and it looks like everyone is having quite a bit of fun and gaining in confidence which is the whole point.
Belmograpgh- three jumper mashup!
I adore my new jumper and I'm wearing it at least once a week, it's great for combating those dreary days. I'm really happy with how the mashup went, I used Beeline by Heidi Kirramer as my base pattern and then eyeballed and appropriated some features from Elmont and graphite(Isabel Kraemer kids jumper currently unpublished). It is a more fitted version of the original beeline, with garter stitch triangles in which my shaping is hidden. As much as I love the jumper I know I made a bunch of mistakes with the pattern as I went along so i feel I'll eventually rip it out and knit it again, though I might end up wearing it to death first!

The Jumper all the beginner knitters have settled on knitting is Skappelgenseren by  Dorthe Skappel, very basic and very simple to do and easy enough to get people started on jumper knitting. The drop shoulder style means not having to worry about shaping. I think a very good beginners pattern, with lots of scope to make changes and develop your own style without going too crazy. I made sure we discussed pertinent issues in our stitch 'n' bitch sessions leading up to the start of the KAL, Such as yarn and needle choice, swatching, adjusting a pattern to your measurements, basic shaping and some extra stitches or stitch patterns in case any one wanted to try and incorporate them.

 I started my own version of the pattern as well, but as with above I've changed the design elements a fair bit and my favourite evil fiddly but oh so beautiful cast on Tubular!


Believe me attempting a tubular cast on in Plötulopi also known as Unspun Icelandic wool was an exercise in patience, tension regulation and prayer (more blind hope than actual prayer though). I decided to do the pattern in the round with a stockinette back and garter stitch front, For a slightly different high low effect. To save myself serious upset and to make allowances for my tension, I picked a tensioning yarn, a nice lurex in a laceweight wire like feel, this was to provide some strength while I was knitting it and means that i can knit to pretty much my usual tension as the stress mostly goes on this yarn. It isn't a completely foolproof method but it has been very helpful.


Do you ever make adjustments for you tension with delicate yarns?


Tuesday, 4 February 2014

Did someone say Knitalong?!?!

ARGH! a whole month without an update?

It really has been a very busy and hectic January. Not just on the Knitting front mind, but with moving and finishing work and more "fun" things. I am no longer based in London, but now in Leeds, "oh Leeds how I have missed thee?". My new digs are a little small and whilst equipped with a fair few cubbyholes is unlikely to successfully hold all my stash. So i'm going to have to be parted with much of it again, and be very smart about what projects I am going to be knitting in the next few months to stash bust to make way for more!
Little teaser of the Test Knit I mentioned last month
So of course my genius plan to sort this out, was to do a Knit along with some of my friend's from I Knit in London. Combating the issue of plans for stashbusting and also keeping us "bonded" in a small way. Now me saying a Knit along is a little misleading, because we are in fact doing 11! Over the course of this year.  The simple idea of a Knit along grew and grew and became a devil monster of a crazy suspiciously organised thing, but really, with myself at the helm and several others going along for the ride it could be no less.

So when I say that those 11 KALs are our shortlist, you should not be surprised. I wouldn't be able to tell you the number of project suggestions we started off with as everyone had a good deal that they wanted to knit, but with vetoing powers and bribery in some cases (You know who you are!) we managed to get a list of 22 patterns, which we then priority voted down to 11. Another Priority vote after than and we had our knitting order.

The clear winner was Carpino by Carol Feller
An absolutely lovely pattern and with the yarn choices, ranging from Rowan Kid silk haze glamour, Uppingham Shetland 4ply yarn, botany lace to my gorgeous blue purple marl from Kingcraig they all promise to be the same beautiful project but stunningly different!

Next up as a light relief and an "I'm frustrated with this lace pattern and 4ply" project we have Millwater by Beth Kling
Scrumptious cowl that it is I have ummed and aahed about what yarn to knit it in and think i might end up dyeing some yarn to use for it, but then again I'm not sure.

The rest of the list consists of

Of course this wasn't enough for me and i had to add one last KAL with a friend in Leeds to make a little bit rounder in number, i am finally going to be knitting a version of Aidez. Aidez with several modifications i should say, as i'm adding pockets, buttons, a hood and a different cable pattern for the back.

Last month in all of the hecticness i did manage to carve out a little time to do some yarn dyeing so feast your eyes on the lovelies as they hung to dry.

Left to right, Malabrigo lace, and several Kingcraig Shetland DK (sugarflair dyes used)
I've wound up those pretties and looking forward to using them, now what project to knit in a gradient yarn.......

On another note if you are interested in Knitting one of the items listed above, join our KAL all you have to do is pick a stash yarn to do it in and comment, my favourite suggestions will receive the pattern free as a gift on Ravelry. 


#knitting  #giveaway