There are a few techniques in the pattern that are not necessarily standard to all jumper patterns, though are really handy to know how to do. There are links to tutorials for all these techniques in the techniques section on the first page.
German Short Rows
On the WS Side
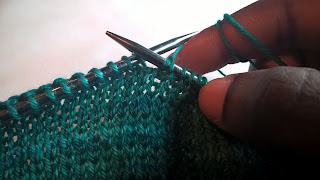
German short rows on the wrong side are created by purling to the last stitch before you turn your work (or if you are adapting a wrap and turn pattern, purling the stitch you would have wrapped) and after turning to the RS bring the yarn to the front between your stitches then slip the last stitch from your LHS needle to your RHS needle.

Lift the yarn up and over the LHS needle, so it carries the stitch below upwards and continue knitting. You will now have what looks like a double stitch on the needle where you turned.
On the RS side
To do a German short row on the right side all you need to do is knit to the last stitch where you turn (if in a wrap and turn pattern, knit the stitch you would have wrapped), turn the work and slip your last stitch. Lift the working yarn over the needle as if you are doing a yarn over from front to back and bring the yarn back to the front. Then purl up to your next turning point. There will be a what looks like a double stitch on the needle where you turned.
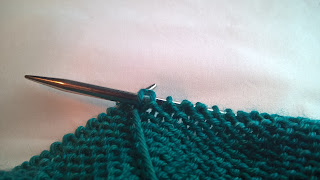
These double stitches are useful for showing you where your turning points are and are worked as a single stitch. The beauty of this is that the lifted stitch closes any holes between the two different levels of stitches at your turning points and also creates a smoother step. It is also less visible from both sides of the knitting when picked up. So when you go to incorporate your short rows into the fake shoulder seam, you only have to knit or purl as you normally would treating the double stitches as one single stitch. Nice and simple, and very neat.

Grafting is also referred to kitchner stitch. The wrap front of the jumper requires grafting in the centre if you elect to knit the pattern as written either bottom up or centre out with the bottom half of the jumper being knit first. Whilst grafting requires patience, it is actually relatively simple to do neatly in plain stockinette and in a ribbed pattern.
Lucy Hague's instructions for grafting in pattern are amazing and can easily be translated here, for this particular pattern the stitches that you will be grafting in pattern are
p1 k1 p1 k1 p1 Knit x stitches p1 k1 p1 k1 p1
To prepare your knitting for grafting, Get another cable needle and pick up the stitches from the provisional cast on/ or waste yarn left at the back, this should match the amount of stitches you have left on your other needle after joining the left and right wrap sections together. This ensures you have two sets of live stitches, For the purposes of grafting your front stitches will be the bottom and the top stitches will be the back stitches. So when you hold it up the RS of the bottom will be facing you and the WS of the top will be facing you behind the bottom.
With 2-3x the length of your row of yarn for grafting, add your sewing needles and follow the instructions below by when the instructions say purl, pulling the needle and yarn through the centre of the stitch from behind, and when the instructions say knit pulling the needle and yarn through the centre of the stitch from the front.
Here is a useful grafting video showing you the stockinette method.
With this in mind you follow the instructions like so
1 p st, 1 k st on F
F: purl off, purl on
B: purl off, knit on
1 k st, 1 p st on F
F: knit off, knit on
B: knit off, purl on
1 p st, 1 k st on F
F: purl off, purl on
B: purl off, knit on
1 k st, 1 p st on F
F: knit off, knit on
B: knit off, purl on
1 p st, 1 k st on F
F: purl off, purl on
B: purl off, knit on
Then
2 (or more) k sts on F
(Stockinette grafting)
F: knit off, purl on
B: purl off, knit on
until you reach your last knit stitch before the next purl where you will then
1 k st, 1 p st on F
F: knit off, knit on
B: knit off, purl on
1 p st, 1 k st on F
F: purl off, purl on
B: purl off, knit on
1 k st, 1 p st on F
F: knit off, knit on
B: knit off, purl on
1 p st, 1 k st on F
F: purl off, purl on
B: purl off, knit on
1 k st, 1 p st on F
F: knit off, knit on
B: knit off, purl on
All credit goes to Lucy Hague for the grafting instructions, I have only organised them into the order used for grafting in this pattern.
Let me know if there are any other techniques I should go over.
Have you had any experience grafting in pattern before?
Short rows
Short rows are a requirement in the pattern to work the shoulder slopes on the back and the front of the jumper. There are many different short row techniques out there including wrap and turn. However the recommended short row method in the pattern is either Japanese short rows or German short row. This is because these methods are simple and less noticeable in the fabric, in fact there are many times that I have gone back to look at my knitting and I can't see where my short rows end, because it blends in so well. Of the two methods in the pattern German short rows are the simplest and easiest to do, they don't require any extra knitting supplies like stitch markers or pins and they are easy to work both when doing the short row and closing it.German Short Rows
On the WS Side
German short rows on the wrong side are created by purling to the last stitch before you turn your work (or if you are adapting a wrap and turn pattern, purling the stitch you would have wrapped) and after turning to the RS bring the yarn to the front between your stitches then slip the last stitch from your LHS needle to your RHS needle.

Lift the yarn up and over the LHS needle, so it carries the stitch below upwards and continue knitting. You will now have what looks like a double stitch on the needle where you turned.

On the RS side
To do a German short row on the right side all you need to do is knit to the last stitch where you turn (if in a wrap and turn pattern, knit the stitch you would have wrapped), turn the work and slip your last stitch. Lift the working yarn over the needle as if you are doing a yarn over from front to back and bring the yarn back to the front. Then purl up to your next turning point. There will be a what looks like a double stitch on the needle where you turned.


Grafting
Grafting is also referred to kitchner stitch. The wrap front of the jumper requires grafting in the centre if you elect to knit the pattern as written either bottom up or centre out with the bottom half of the jumper being knit first. Whilst grafting requires patience, it is actually relatively simple to do neatly in plain stockinette and in a ribbed pattern.
Lucy Hague's instructions for grafting in pattern are amazing and can easily be translated here, for this particular pattern the stitches that you will be grafting in pattern are
p1 k1 p1 k1 p1 Knit x stitches p1 k1 p1 k1 p1
To prepare your knitting for grafting, Get another cable needle and pick up the stitches from the provisional cast on/ or waste yarn left at the back, this should match the amount of stitches you have left on your other needle after joining the left and right wrap sections together. This ensures you have two sets of live stitches, For the purposes of grafting your front stitches will be the bottom and the top stitches will be the back stitches. So when you hold it up the RS of the bottom will be facing you and the WS of the top will be facing you behind the bottom.
With 2-3x the length of your row of yarn for grafting, add your sewing needles and follow the instructions below by when the instructions say purl, pulling the needle and yarn through the centre of the stitch from behind, and when the instructions say knit pulling the needle and yarn through the centre of the stitch from the front.
Here is a useful grafting video showing you the stockinette method.
With this in mind you follow the instructions like so
1 p st, 1 k st on F
F: purl off, purl on
B: purl off, knit on
1 k st, 1 p st on F
F: knit off, knit on
B: knit off, purl on
1 p st, 1 k st on F
F: purl off, purl on
B: purl off, knit on
1 k st, 1 p st on F
F: knit off, knit on
B: knit off, purl on
1 p st, 1 k st on F
F: purl off, purl on
B: purl off, knit on
Then
2 (or more) k sts on F
(Stockinette grafting)
F: knit off, purl on
B: purl off, knit on
until you reach your last knit stitch before the next purl where you will then
1 k st, 1 p st on F
F: knit off, knit on
B: knit off, purl on
1 p st, 1 k st on F
F: purl off, purl on
B: purl off, knit on
1 k st, 1 p st on F
F: knit off, knit on
B: knit off, purl on
1 p st, 1 k st on F
F: purl off, purl on
B: purl off, knit on
1 k st, 1 p st on F
F: knit off, knit on
B: knit off, purl on
All credit goes to Lucy Hague for the grafting instructions, I have only organised them into the order used for grafting in this pattern.
Let me know if there are any other techniques I should go over.
Have you had any experience grafting in pattern before?


